Slopes on the windows perform two functions - decorative and practical. They give the window opening a complete aesthetically pleasing appearance after installing a plastic window. On the practical side, they protect the assembly seam from destruction under the influence of moisture and sunlight. By installing slopes for plastic windows with your own hands, you can avoid fogging of the double-glazed windows and freezing them in the winter. How to properly slope plastic windows will be described in this article.
Kinds
Slopes, what is it? In simple words - this is the internal niche of the window opening. Plastic windows can be decorated using various materials inside and outside the room.
The most common slopes of plastic due to the fact that you can install yourself. Their shelf life can be measured in tens of years.. When decorating the opening with plastic slopes, you can achieve the maximum combination with the material of the window frame.
Closing slopes after installing windows using plastic can be done outside, but subject to the use of high-quality material. Otherwise, under the influence of the sun, they begin to turn yellow. And at low or high temperatures, they become fragile.
Stucco finish infrequently. Despite the fact that this is the most budgetary way, it is difficult to make window slopes with this material yourself. Making slopes in this case requires certain professional skills.
Stuccoing windows with windows will take a lot of time, as it will be necessary to complete several layers, which will take time to dry. More often this material is used to decorate the outer parts of the window opening.
Finishing the slopes with your own hands using drywall is a rather laborious process. It is important to note that you can use only material brand GKLV and exclusively for internal work.
After installing the plastic windows, they can be finished from sandwich panels. Slopes are warm and can be installed outdoors and indoors.
For arches, foam PVC elements are installed. It works well in bending.
Metal slopes are the best option for finishing a window niche on the street.
After the windows are installed, the owner decides how to do further decoration. How to install plastic or metal products is described below.
Plaster
Do-it-yourself slopes on stucco windows with the following advantages:
- affordable cost;
- high strength of the coating and its resistance to mechanical damage;
- when installing external decoration, the plaster layer withstands the effects of natural phenomena and temperature extremes;
- to learn how to make slopes on the windows with your own hands using plaster, it is enough to study the basics of finishing work in the relevant literature or on the Internet;
in case of violation of the integrity of the plaster layer, repair of window slopes with your own hands is possible. You can repair the affected area by applying a new layer of solution; - plaster has a long service life.
Of the shortcomings, it is possible to note the low heat-insulating qualities, the need to periodically restore the integrity of the coating, otherwise moisture will get into the cracks and mold will form. How to make such slopes when the window is installed will be described below.
Mounting
Before starting work, you must prepare the tools.
Work is carried out in the following sequence:
- the surface is cleaned of debris and dirt. Irregularities close up with a solution;
- align;
- at the leveling stage, a perforated corner is fixed at the corners of the opening, which will give the opening the correct geometry;
- the resulting surface is treated with an antiseptic and primed;
- apply a plaster layer and grind the surface;
- when the composition dries, the surface can be painted;
Finishes the window opening with decorative plaster.
Drywall
Drywall and products from it have the following positive qualities:
- it is environmentally friendly and safe for humans and the environment;
material is common and affordable; - slopes on the windows with their own hands using drywall can be done independently, without certain skills;
- installation of slopes is quick and with a minimum amount of construction waste;
the window acquires a finished neat appearance; - using drywall, you can arrange an arched opening;
- This material has a long service life;
- the surface of the drywall can be plastered or lined with any finishing materials.
For the design of window openings, it is recommended to use moisture-resistant gypsum board brand GKLV. For the arrangement of external fragments, this material is categorically not suitable, since in a short time it will lose its performance.
How to make slopes on drywall windows step by step will be shown below. It is worth noting that the installation of drywall slopes can be done in two ways: on glue or on a metal frame.
Training
With the method of attaching drywall directly to the base, the latter must be prepared. How to make slopes on the windows using this material will be described below.
- Surplus foam is removed from the window frame with a construction knife.
- The slopes are measured, while the sides are measured twice - near the frame and near the wall.
- The dimensions cut out the necessary elements. A part is drawn on a drywall sheet and an incision is made with the help of a clerical knife so that the blade cuts through the upper paper layer and a little gypsum part.
- Then the sheet is broken and an even cut is obtained.
- From the surface of the window opening, it is necessary to remove dust, dirt and falling off layers of the previous finish.
- After that, the surface is removed with a brush dipped in water.
- If the integrity of the base is broken, then it is restored. Do-it-yourself sealing of the slopes of plastic windows with putty.
- Then the surface is treated with antiseptics, primed and allowed to dry.
The easiest way to mount slopes is to mount on a mounting foam. Even a beginner can handle this.
Mounting
How to make windows decoration from drywall, "putting" them on the foam will be described below.
- the gypsum plasterboard component must be foamed from above, applying foam on its surface with wavy movements. You can also slightly foam slopes;
- the part must be put in its place for a short period of time and pressed against the wall. The foam begins to expand, and the part is torn off until it is seized;
- when the secondary expansion of the foam ends, the plasterboard elements are fixed in place and left for 24 hours;
- after this, it will be necessary to seal the joints and seams with a solution.
Plastic panels
To understand what PVC panels are, you need to familiarize yourself with their positive qualities.
- it is a safe material that does not emit toxic substances;
- it is resistant to moisture;
- plastic is easy to handle, install and operate;
- has a small dead weight, therefore, does not carry a significant load;
does not burn, but only melts. But it is important to know that toxic substances are released during this process;
not afraid of temperature changes; - frost resistant;
- allow you to create an even, durable coating that is not subject to deformation;
aesthetics of the coating allows its use in any interiors; - possesses noise insulation qualities;
- It is not a conductor of electricity;
- resistant to chemicals.
How to make slopes with your own hands from plastic is described below.
Mounting
The dimensions of the parts are removed in the same way as for drywall. Preliminary finishing of the slopes is not necessary. Installation of slopes is carried out using bars and a starting profile.
- the foam is cut with a construction knife;
- make and fix near the window frame on all sides a block of wood;
- a starting profile is attached to the bar;
- the panel must be installed in the start profile;
- the space between the panel and the wall must be properly foamed, and then press the part. A more reliable fixation can be achieved by gluing it to the rail installed along the outer perimeter of the window opening. In this way, all slopes are closed with plastic;
- then the corners are trimmed with a plastic corner and fix the structure using masking tape until completely dry.
Sandwich panels
You can install slopes at plastic windows using sandwich panels yourself in the same way as described above.
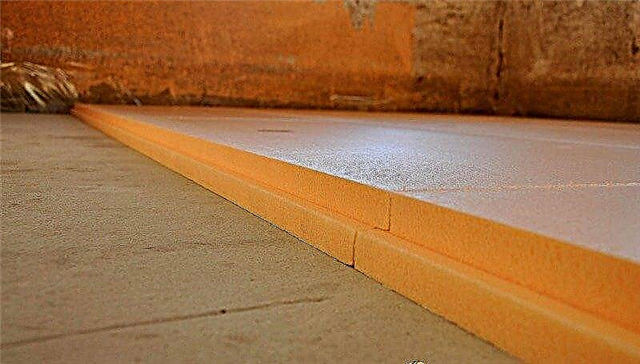
The photo shows a method of attaching a sandwich panel without a starting profile. With this method, a 1 cm depth slot is made in the mounting seam where the panel is inserted. Outside, it is attached to the leveling profile.
Advantages of sandwich panels:
- it is a durable material with a low dead weight;
- it is a modern finishing material, the plastic surface of which can be made in any color;
- It is an energy-efficient material due to the use of expanded polystyrene foam as the inner layer;
- panels are easy to process, install and operate;
- they do not rot and are not moldy.
Metal slopes
Finishing the external slopes on the windows with the help of metal allows you to reliably close the installation joint and protect it from weather conditions.
How to close the slopes after installing plastic windows in stages, will be described below:
- we order sheet metal products in the workshop or do it ourselves, having previously removed the necessary dimensions;
- first of all we strengthen the ebb;
- the space between the frame and the wall must be sealed with sealant;
- side parts are made first;
- fix the top on the screws.